Physical Address
304 North Cardinal St.
Dorchester Center, MA 02124
Physical Address
304 North Cardinal St.
Dorchester Center, MA 02124
John Butterfield is a designer who is both well-known and beloved by solitaire wargamers. From the classic Ambush! to the soon-to-be released Enemy Action: Kharkov, Mr. Butterfield has delivered a slew of well-imagined solitaire games that are both fun, historically accurate and definitely tough to win.
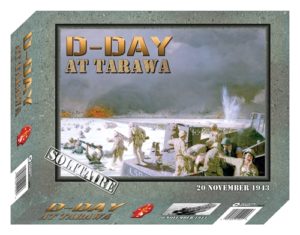
This review is on one of these classics – and it’s not a new game. But as they say when you buy a used car, it’s “new to you” and in this case, that’s true for me. My initial foray into the “D-Day at” series which was created by Mr. Butterfield and began with 2009’s D-Day at Omaha Beach. D-Day at Tarawa was the second game in the series, originally released in 2014 with a second edition boasting a mounted map board (among other improvements) followed in 2017. All the “D-Day at” games have been published by Decision Games with Tarawa being followed by Peleliu (2015), Iwo Jima (2018) and the upcoming D-Day at Saipan (scheduled for summer 2022).
I decided to go with D-Day at Tarawa as my entry point for this series, based on two factors: first, I am a sucker for Pacific Theater games and a Marine Corps fanboy (despite being a USAF veteran) and second, I had read that Tarawa was a better introduction to the series than Omaha Beach. This put in a good spot amongst its “siblings” – Peleliu is considered extremely tough and Iwo Jima, the first in the series not designed by Butterfield, has taken a lot of flak (of the printed variety) for, among other things, its abandonment of the firing “dots” used by Butterfield in the previous entries in the series.
D-Day at Tarawa currently boasts a solid 8.2 on BoardGameGeek, .1 behind Omaha Beach and Peleliu, but well ahead of the much-maligned Iwo Jima entry (6.9). Having now taken it for a spin, I feel it’s time to provide my thoughts on this classic.
ONE SQUARE MILE OF HELL
Tarawa itself is an atoll in the Central Pacific, consisting of several islands, the largest of which is Betio (pronounced Bay-sho) – and it was here that the 2nd Marine Division landed and did fierce battle with the Japanese defenders over three days beginning on November 20, 1943. The invasion was the first in the Central Pacific portion of the U.S. forces’ island-hopping campaign that culminated at Okinawa 19 months later.
I’d highly recommend for anyone who likes to get to know a game’s setting before playing the book “One Square Mile of Hell” by John Wukovits and also, if you have Amazon Prime, you can watch at no cost the 2005 documentary “As It Happened: Tarawa” which uses archival footage and some interviews with surviving Marines who took part in the battle.
The title of Wukovits’ book is an accurate one-sentence descriptor for the battle the 2nd Marine Division faced on Betio. The game does a fantastic job illustrating just how tough this fight was – up to, and beyond (for some) the point of frustration. The frustration is due to the way the game models the difficulty the Marines had just getting to shore, let alone what happened once they did make it onto the beach.
This is a card-driven game, featuring no dice. While that may turn some players off, it is an extremely well-designed mechanic and simplifies a lot of decision points that would otherwise require a slew of rules and a bucket of dice to be rolled.
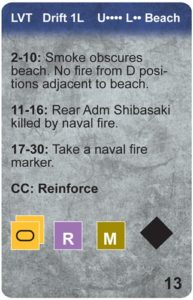
For example, the first phase of every turn is devoted to the amphibious landing of the Marines. First a card is flipped (see the top line of the card image at right) to determine the drift of your LVT (Landing Vehicle Tracked – which were the only mode of transport the USMC had to get over the reef surrounding the island). Each LVT is resolved individually – the first roll for drift based on the swirling tide inside the reef, and the second (the right-side of the top line of the card) for the damage the LVT – and its precious cargo of Marines – takes on the way to the beach.
As was the case historically, expect to lose a LOT of LVTs. The Marines ended up wading to shore through murderous small arms fire from the entrenched Japanese defenders (who were not wiped out by the thunderous pre-landing bombardment by U.S. Navy ships that included battleships). This happened in the battle, and the game models it, correctly and brutally. It is an incredibly tense and often maddening experience trying to get your Marines to the beach.
THE FEW, THE PROUD
After the amphibious phase, your Marines face Japanese fire. This mechanic, which is at the heart of how the system “attacks” your men, is based on what at first blush appears to be a mess of colored dots, color-highlighted hexes and dashed lines. The dots come in two varieties, one filled completely and the other partially and these determine the type of fire the Japanese can lay on the hex in which the dot is located. The lines indicate the fields of fire, which stretch out to the reef and through which your Marines will need to wade if their LVT is destroyed (or so many have been destroyed in previous turns that there aren’t any available to carry them). The hexes represent the positions of the Japanese forces and can be linked together by dashed lines making them more lethal.
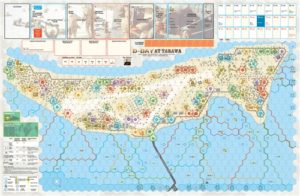
The map is shown at left. It’s mounted, which is nice, and though this is a small version, it is quite busy with the many colored positions, firing dots and fields of fire on it. When first seeing it, it can be a bit overwhelming but after a few turns you will be used to how it works and can appreciate just how ingenious this system is.
The map also has spaces for pretty much all the pieces you’ll need for play (I say almost, because it doesn’t quite have space for everything). There’s a phase track at the top which guides you through each turn. Alongside that on the right is the turn track and you’ll place your waves of units in the box for the turn in which they’ll attempt to hit the beach.
The Japanese forces have several types of positions including coastal and inland (among others) and these are the colored hexes. The card will show three sets of colored boxes, either singly or in pairs – these are the colors of the hexes the Japanese will be firing from in the turn for which you’ve flipped the card. Symbols sometimes appear on the card such as a star or a NATO armor symbol as well as letters which permit the Japanese to conduct actions other than firing. Finally there is a symbol (such as a diamond, square, circle or triangle) that will match up with a symbol on the US unit counters indicating the target of a Japanese fire attack.
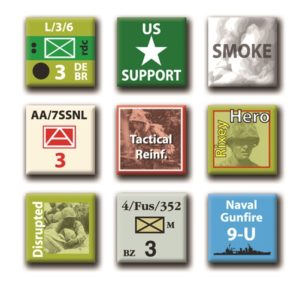
The Marines have eight “hero” counters which come with bonuses that can be applied during the US Action phase. These include things like “free actions” because the US is limited to three actions otherwise. Things like that make the hero counters very valuable. They are all based on historical Marines such as Major Michael P. Ryan who pulled together the jumbled-up assortment of men from various units that had taken heavy losses from the withering enemy fire during the landing and led them to clearing the western end of the island. Another was Lt. Colonel Presley M. Rixey, who commanded a howitzer battalion and whose counter is shown at the right (among other example counters).
The game has several scenarios and a campaign game, covering various segments of the fight. All of them are tough to win. Simply getting your men onto the beach is a herculean task. Doing something with the sometimes shattered remnants is also no gimme. The rules do allow you to hold a landing wave for one turn because after turn 1 your supply of LVTs is likely to be greatly diminished. Or you can try having the men wade to shore, which a long and dangerous slog as they will take fire every turn and it will take several turns to reach the beach.
The cards can be merciless, but also helpful – there are events included on some of them and like the rest of the info on the cards, some will benefit the USMC and some will benefit the Japanese. One event you’ll appreciate getting is the death of Rear Admiral Meichi Shibasaki, the Japanese commander. He had boasted to his men (which included over 2500 Imperial Marines) that “a million Americans couldn’t take Tarawa in 100 years.” His presence is required for a good number of pro-Japanese events and his death prevents those from occurring. You have no control over when (or if) the admiral dies, but if/when he does, it will make your job easier.
The first 10 turns of the game are simplified, allowing newcomers to get their feet wet before things ramp up on turn 11 and beyond. By this point you will either have successfully landed enough Marines on Betio to make a go of finishing the campaign, or you’ll have lost. Expect to lose, likely several times. Winning the game is difficult to say the least. Accomplishing it will certainly reward you with a sense of satisfaction and a job well done.
Now that I have experienced this game, I have no doubt that I’ll be picking up the remainder of the series, including Iwo Jima (I won’t bash a game until I’ve played it – and a revamped rules system is being released with D-Day at Saipan). And speaking of Saipan, that game is available for pre-order on the Decision Games website (link at the bottom of this article). I’ve heard that both Omaha Beach and Peleliu are tougher than Tarawa; to me that represents an enormous challenge that I can’t wait to experience.
There’s also a video to accompany this review, the first in a series detailing a playthrough of the game.
The game itself is still widely available, and can be purchased directly from Decision Games as well, here.
Comments are closed.
Terrific overview, Joe. Butterfield is a terrific designer, his solitaire efforts are legendary. Please continue with the series as long as you have the interest!
Thanks for your blog, nice to read. Do not stop.